Learn how to sauté, sear, and braise like a pro — and bring out the best in your food, simply.
Imagine a flawlessly seared scallop — crisp and golden brown on the outside, succulent on the inside. A sautéed autumn vegetable, caramelized and nutty. Fall-off-the-bone braised beef.
Food that has been cooked to artistic perfection makes our senses come alive.
Sure, seasoned chefs can do it, but so can you, using the basic tools you already have in your own kitchen. With a few techniques — and a better understanding of the science that makes these techniques so versatile — you can add rich flavor, captivating color, and tantalizing texture to your favorite foods.
These three cooking fundamentals — sautéing, searing, and braising — will help you create meals that satisfy your palate with more ease and confidence, and support your commitment to cooking and eating healthy, too.
SAUTÉING
Effect: By cooking foods quickly over medium to high heat in a small amount of fat, you create a delicate, crisp-yet-tender texture that brings out a touch of sweetness.
Science: Caramelization begins when sugar molecules in carbohydrate-rich foods like fruits and vegetables break apart under heat, forming chemical products including fragrant volatile compounds, sour organic acids, and sweet and bitter derivatives. Timing is key: Well-caramelized food will have a sweet, nutty taste; overcooked food will lose its sweetness and be bland.
Nutrition: A quick sauté minimizes enzyme and nutrient loss, while a longer cooking time will bring out more color and texture. In some foods, nutrients become more available through heat: When tomatoes are combined with oil and subjected to intense heat, for instance, their lycopene molecules become easier to absorb.
Tips:
- – Avoid crowding the pan, which may cause the food to steam rather than sauté.
- – Make sure that the bottom of the pan is coated with oil. This allows for more uniform heating and prevents sticking.
Technique:
- – Use a traditional sauté pan with a large, flat bottom (for maximum cooking surface); low, straight sides to allow steam to escape; and a long, stay-cool handle for easy lifting. A skillet with sloped sides will also do the job.
- – Preheat your pan (medium to high heat), and add only enough oil to lightly coat the bottom (extra-virgin olive oil for up to medium-high heat or a high-heat oil like coconut for high-temperature sautés).
- – Cook three to five minutes, tossing frequently for a light sauté; use higher heat and longer cooking times to brown. Thicker vegetables like Brussels sprouts and cauliflower may take 10 minutes or more.
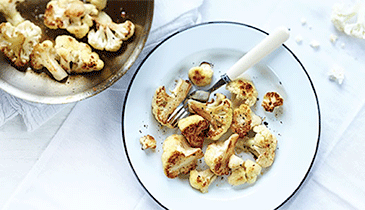
SAUTÉED CAULIFLOWER
Sautéing these sturdy vegetables over medium-high heat caramelizes their natural sugars, developing rich color and flavor. For additional pizzazz, toss and coat with various seasonings at the end, such as fresh lemon juice and herbs, or a tablespoon of butter and minced garlic.
Makes four servings
Preparation time: 10 minutes
Ingredients
2 tbs. extra-virgin olive oil
4 to 5 cups cauliflower florets or slices, with some of the stem intact
Salt and freshly ground black pepper to taste
Preheat a pan over medium-high heat, then add the oil and heat for 30 more seconds. Add the cauliflower, taking care not to crowd the pan. Give the pan a quick shake to prevent sticking, then allow the cauliflower to sit still for a few minutes until brown on one side, then turn to brown other side. Season with salt and pepper and serve hot.
SEARING
Effect: This high-heat technique creates a brown crust on the surface of foods, which in turn develop a deep, nutty, meaty, savory flavor. It’s often the first step in a two-part process: Searing cooks the outside of foods at high temperatures, then the inside of the food may be further cooked at a reduced temperature in the oven or a sauté pan, on the grill, or by braising.
Science: You may have heard that searing “seals in the juices” of foods like meat, but the true purpose of this technique is to increase flavor. The Maillard (pronounced “my-yar”) reaction occurs when carbohydrate and amino-acid molecules in nonsugary foods respond to heat, starting around 250 degrees F. The reaction produces changes in the texture and color of foods, and creates so-called Maillard flavors, including savory, floral, meaty, and earthy.
Nutrition: While seared meats taste great, the technique also creates compounds called advanced glycation end products (AGEs). High levels of these compounds are known to trigger an inflammatory response, and have been connected to diabetes and cardiovascular disease. Eat antioxidant-rich produce or herbs along with seared meats to help mitigate damage.
Tips:
- – Use dry ingredients (blot water off, for example).
- – Select a pan that is large enough so there’s space around each piece of food.
- – Pay close attention, as food can burn quickly at such high heats.
Technique:
- – A heavy stainless-steel or copper pan with a flat bottom works well for scallops or thin-skinned fish; a cast-iron skillet is better for steak, pork, or chicken. Avoid nonstick skillets as well as lightweight pans.
- – Preheat the pan over medium-high to high heat. Use a higher-smoke-point oil like rice-bran or ghee. Heat oil to a shimmer (but not to smoking), then add the food.
- – Let food sizzle in one place until a golden-brown crust forms: The food will release from the pan easily when a crust has formed.
PAN-SEARED SCALLOPS
 Cooking delicate scallops quickly over high heat prevents moisture and flavor loss. By searing deeply on one side, you’ll allow the scallops to develop a crisp golden crust. Then all you have to do is flip them to allow the skillet to “kiss” the other side. Don’t be afraid to use a hot pan.
Makes four servings
Preparation time: 10 to 15 minutes
Ingredients
12 to 16 fresh sea scallops
Sea salt and freshly ground black pepper
1 to 2 tbs. rice-bran oil, ghee, or other high-heat oil
Rinse the scallops and blot with a paper towel. Set them back onto a paper towel to absorb excess moisture. Season with salt.
Heat a heavy stainless-steel skillet over high heat. When a few drops of water flicked into the pan hop and sizzle, add the oil and heat for 30 seconds. Add scallops to the pan, seasoned side down, making sure they aren’t touching each other. Sear for about two and a half minutes, until the bottom of the scallops are golden brown. Sprinkle salt on the exposed side, and then turn scallops over and sear for about 30 seconds. Remove from the pan, season with freshly ground black pepper (to taste), then set aside to rest while you make the optional pan sauce and spinach (or you can just squeeze a little fresh lemon juice over the scallops before eating).
PAN SAUCE AND WILTED SPINACH
1 tbs. high-heat oil
1 shallot, minced
1/2 cup dry white wine, plus 2 tbs.
1 tbs. chopped fresh tarragon
4 tbs. butter, chilled
6 cups fresh spinach, washed and dried well
Sea salt and freshly ground black pepper
Once you remove the scallops, keep the pan hot and add another drizzle of oil. Add the minced shallot and sauté until just golden. Add 1/2 cup of wine. Stir to scrape up all remnants from cooking the scallops (this is called “deglazing the pan”). Cook until wine is reduced to half original volume. Then add tarragon and whisk in butter, reducing heat to low, stirring constantly to blend the butter into the sauce. Salt to taste. Divide sauce equally onto four plates and top with scallops.
Toss the spinach into the hot pan. Add a couple of tablespoons of white wine, and cover to steam for a minute or two. Season with salt and freshly ground pepper and serve alongside the scallops.
BRAISING
Effect: Braising uses a combination of moisture and slow, low heat to cook meats and vegetables, creating moist, tender foods and harmonious flavors. Food is immersed in, but not covered by, an aromatic liquid such as broth, wine, or stock, and allowed to steam on top. The liquid can then be reduced to a beautiful glaze or sauce.
Science: When meat is heated gently and gradually through braising, its connective tissue dissolves into gelatin, and the fibers separate and remain tender. With higher cooking temperatures, you end up with tough, chewy meat.
Braising also softens tough plant fibers, making it an effective technique for cooking greens, root vegetables, and squashes.
Nutrition: Don’t throw out the liquid remaining in the pot after braising veggies or meat — you’ll miss out on important nutrients, including the anti-inflammatory amino acids and protein in the dissolved gelatin of meat ingredients. These amino acids (namely glycine, glutamic acid, proline, and alanine) are lacking in most American diets. Gelatin is thought to support joint strength and repair, as well as the liver’s detoxification abilities.
Tips:
- – Keep sliced meats at least 1 inch thick; if possible, use a full cut tied in butcher’s twine to retain moisture.
- – Choose bone-in meats for enhanced flavor and nutrients from the bone and marrow.
- – Take care not to overcook veggies, which can get soggy quickly.
Technique:
- – Use a heavy, deep pan with a tight-fitting lid to prevent moisture evaporation; a Dutch oven works great.
- – First sear every side of the meat or vegetables in a little oil in the uncovered pan on the stovetop. Then add liquid, such as broth, tomato sauce, or wine, to the pan to submerge the food by about two-thirds. Cover the pan.
- – Temperature is key in braising. It should be kept low and below boiling, around 250 to 325 degrees F, so that the liquid in the food itself doesn’t begin to boil.
- – Cooking times vary: Dark leafy greens will braise in just a few minutes, while a roast can take several hours.
BRAISED GREENS
 Braising hearty greens helps make them tender, and finishing them with a splash of vinegar brightens their flavor. Play with different combinations by switching up your oils and acids: Instead of olive oil and vinegar, try coconut oil and brown-rice vinegar, or ghee and fresh lime juice. Other nice flavor additions include grated fresh ginger, crushed garlic, or minced jalapeños.
Makes four servings
Preparation time: 15 minutes
Ingredients:
2 tbs. extra-virgin olive oil
1 small red onion, minced
2 bunches kale, collard greens, or Swiss chard (washed, tough stems removed, cut into 2-inch pieces)
2 tbs. apple-cider vinegar
1/2-cup vegetable or chicken broth
Salt and freshly ground black pepper to taste
Heat olive oil in a large skillet over medium heat. Add onion and sauté until golden brown. Add greens and toss them until they wilt and fit in the pan.
Add vinegar, broth, salt, and pepper, and cover the pan. Allow the greens to braise in the liquid until tender, about three to five minutes. Stir halfway through cooking time to cook evenly. Adjust seasonings to taste and serve warm.
SAUTÉED APPLES WITH MAPLE-GLAZED PECANS
Sautéing apples enables you to cook them through without dehydrating them like baking or roasting does, and it allows the apples to maintain their shape and not get mushy. Serve with plain yogurt, a drizzle of cream, or a crumble of goat cheese.
 Makes four servings
Total preparation time: 15 minutes
1/2 cup pecan halves, coarsely chopped
4 tbs. butter, divided
4 tbs. maple syrup, divided
2 Fuji apples, cut into slices
Pinch of sea salt
1/2 tsp. cinnamon
1/4 cup apple cider
Butter a heat-resistant plate and set aside. Chop the pecans and slice the apples.
Heat a heavy stainless-steel or cast-iron skillet over medium heat and dry roast the pecans until fragrant, about four to five minutes. Add 2 tablespoons of butter and 2 tablespoons of maple syrup. Sauté until the syrup begins to crystalize, about two to three minutes. When the syrup has thickened, turn the glazed pecans onto the buttered plate.
Return pan to heat and add the remaining 2 tablespoons of butter and apples. Add salt and cinnamon and sauté apples for one to two minutes, until they begin to release their juices and soften. Increase heat to medium high and add remaining maple syrup and apple cider to the pan. Cook, while stirring, until syrupy and bubbling. Serve the apples topped with the maple-glazed pecans.