 Tired of the same old stretching routine? Functional Range Conditioning can help you build flexibility, athleticism, and real-world strength in a whole new way.
Popular wisdom says stretching doesn’t build muscle, burn fat, or shave time off a 5K. As a result, many of us shortchange or skip the practice altogether in our workouts.
But according to many fitness experts, popular wisdom is wrong —and we’re missing out on its benefits.
Stretching has been shown to help prevent injury, heal old hurts, improve range of motion, reduce muscle tightness and imbalance, and improve athletic performance. In fact, it’s so important to overall fitness that it’s not something to approach haphazardly.
Welcome to stretching 2.0 by way of Functional Range Conditioning (FRC). This stretching protocol — created by Toronto-based sports-specialist chiropractor Andreo Spina, DC, FCCSS(C), CPT, who advises several pro sports teams — aims to build strength and flexibility systematically and progressively.
Though commonly treated as separate skills, flexibility and strength are closely related; together, they comprise mobility. Often, says Spina, mobility restrictions occur because our muscles lack strength or flexibility (or both) at their end-range positions.
This may take the form of tight hips that make it hard to squat, or tight shoulders that make it tough to raise your arms overhead.
Another expression is hyperflex-ibility, which often forces people to avoid certain movements for fear of going too far and injuring themselves. Common examples include over-rotating your lower back or overextending your neck.
Whether the problem is too little or too much flexibility, FRC practitioners address the issues with dedicated exercises that aim to find balance in strength. It’s an effective approach that has caught the attention of trainers, therapists, and pro athletes alike in recent years.
Spina based the FRC method-ology on careful analysis of existing research about the best ways to make muscles simultaneously stronger and more supple. It builds on tried-and-true techniques from yoga (in which practitioners actively move themselves into poses) and proprioceptive neuromuscular facilitation, or PNF (in which a coach applies resistance as practitioners attempt to shorten a stretching muscle). (Learn more about PNF at “Smart Stretching“.)
By focusing on building strength and flexibility in the end ranges of motion, FRC is an innovative way to improve mobility and overall movement quality.
LENGTH WITH STRENGTH
Mobility is essential both in athletics and in daily life: It helps you maintain control of your body and avoid injury, even when unusual circumstances — slipping on ice, jumping to catch a Frisbee — place your joints in potentially dangerous positions.
It’s no secret that our modern lifestyle has deleterious effects on our health, joints included. “We sit rather than stand, drive rather than walk,” says Spina. “The body has no reason to hold on to mobility it doesn’t need. So we lose it and then wonder why we hurt ourselves squatting or doing Olympic lifts in the gym.”
FRC aims to restore those lost ranges of motion so that complex movements — be it reaching into the back seat of a car to retrieve a purse or performing a deficit deadlift — become easy once again.
One way FRC does this is by focusing on building your joints’ passive flexibility, while also increasing their active range of motion. To feel the difference, try this test: Stand on one foot and lift your other knee as high as you can. Then grab your knee and see how much higher you can pull it.
The first position is the limit of the active range of motion you can control, or your mobility. The second position is the passive range your joint can reach but over which you have little control — your flexibility. There will always be some difference between these two points; the goal of FRC is to reduce this gap.
“Passive flexibility isn’t very useful,” says FRC instructor Dewey Nielsen, owner of Impact Performance Training in Newberg, Ore. At best, haphazard stretching, no matter how well-intentioned, can be ineffective, resulting in little functional improvement. At worst, Nielsen notes, it can be outright dangerous to passively push your body into ranges of motion it can’t actively control.
Forcing your body into the full expression of an exercise when you cannot control it is asking for trouble, agrees personal trainer Hunter Cook, NASM, AFAA, FRCms, based in Long Beach, Calif.
“Injuries happen when your body encounters a force that exceeds the load-bearing capacity of the tissue,” he explains. Imagine, for instance, a 200-pound man who gets injured by putting his full weight on an ankle joint that can’t handle his weight. “If he doesn’t increase the capacity of the tissue to bear load beyond what it did before the injury, he’ll reinjure the same area when he puts that same force on it again.”
When FRC practitioners are working with injured clients, they take care to rehab the area so it can withstand more force than it could before the injury, resulting in an ankle, joint, or knee that’s more resilient and injury-proof.
Ready to try FRC? The following workout just might change your mind about the value of stretching.
THE FRC WORKOUT
An FRC-certified trainer can help you learn and refine the method, but having a coach isn’t necessary to get a feel for the FRC system. For a primer on this tough-but-effective approach to amping up your stretching routine, add these moves to your workout program — once or even several times a day. You can do the exercises on their own, or right after a workout, when muscles are warmed up and pliable.
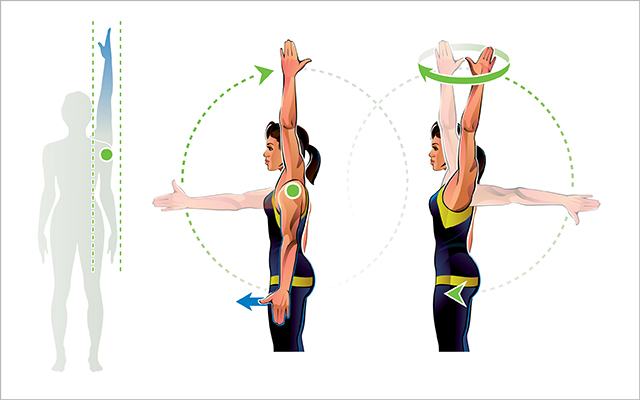
CARS SHOULDER ROTATIONS
Illustrations by Kveta
Purpose: To increase the functional range in your shoulder joint.
How to Do It:
- Stand tall and contract your legs and core so that your body is stable.
- Slowly and with maximal tension in your left shoulder, rotate your left hand so that the palm faces your thigh.
- Keeping your elbow straight and your thumb pointed upward, lift your arm forward and overhead as high as possible.
- When your arm is vertical, reach up as far as possible, then internally rotate your shoulder so that your thumb faces forward and your palm faces outward.
- Without flaring your arm out to the side, continue circling your entire arm backward and down behind you until your arm is by your side again.
- Repeat the same movement a total of three times.
- Reverse the movement, circling your arm back, then forward in the same manner a total of three times.
- Repeat the movement with your left hand.
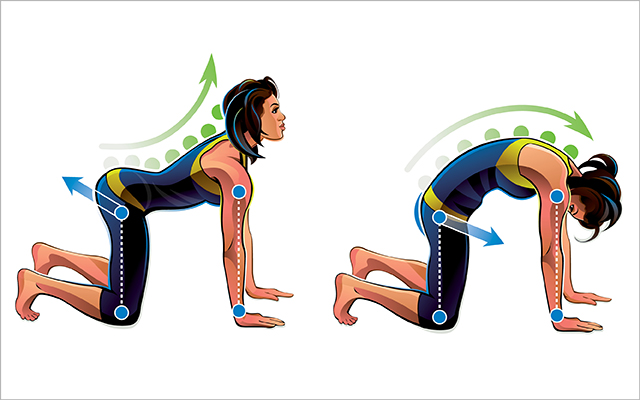
SEGMENTED CAT–CAMEL
Illustrations by Kveta
Purpose: To increase control and awareness throughout your spine.
How to Do It:
- Assume an all-fours position with your hands under your shoulders and knees below your hips.
- Minimizing movement further up your spine, tip your pelvis forward so that your tailbone lifts slightly toward the ceiling.
- Beginning with your lowest vertebra, slowly lower your back into a fully arched position, one vertebra at a time. Pay particular attention to the vertebrae between your shoulder blades. The entire sequence should last 30 to 45 seconds, and your head should be the last thing to come up.
- Starting at your tailbone, slowly reverse the movement, taking 30 to 45 seconds, until your back is rounded up toward the ceiling and your head is hanging toward the floor.
- Repeat three to four cycles.
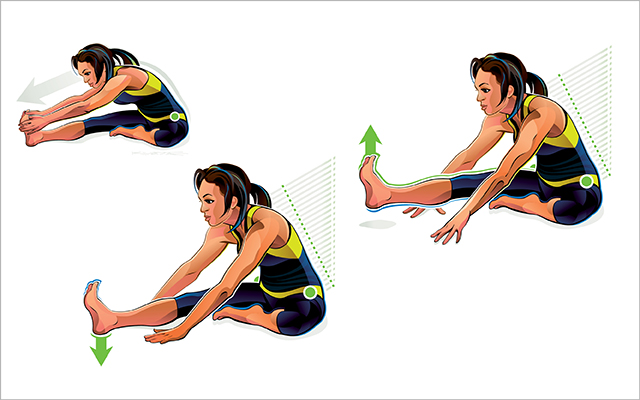
DIY PAILS AND RAILS
Illustrations by Kveta
Purpose: Trains muscles to support the joint at the outer edges of their range of motion, giving you more control and usable range.
How to Do It:
- Sit on the floor with your right leg straight and your left leg bent so your foot is near the inside of your right thigh.
- Keeping your back straight, hinge from your hip joints and bend as far toward your right foot as you can, grabbing it if possible. Hold for 30 seconds.
- Back off the stretch a little, then push your right heel into the floor as hard as possible for 10 seconds. (This is the PAIL stretch.)
- Release the tension, then reach forward again. Hold the stretch for 10 to 20 seconds.
- Back off the stretch again, and, keeping your right leg fully locked out and your toes pointed upward, raise your right heel from the floor as high as possible. Hold for 10 seconds. (This is the RAIL stretch.)
- Release the tension, lowering your leg to the floor, and reach toward your foot again. Hold for another 10 seconds.
- Repeat the entire sequence with your left leg extended in front of you.
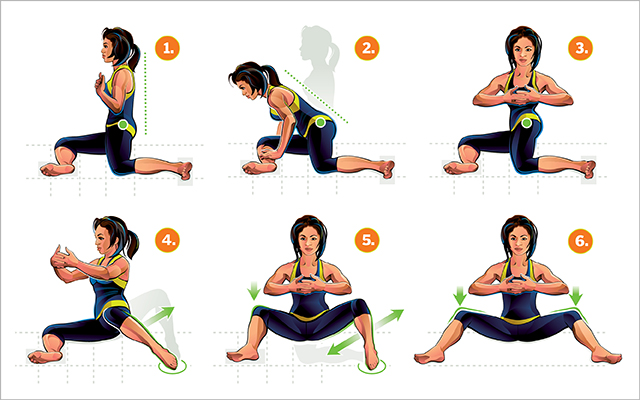
90–90 HIP OPENER
Illustrations by Kveta
Purpose: Builds and maintains range of motion in the hips, and prepares joints for challenging strength-training and athletic movements like squats, deadlifts, and jumps.
How to Do It:
- Sit on the floor with your feet flat and your knees bent.
- Turn your body 90 degrees to the right, dropping your knees so that the outside of your right knee and the inside of your left knee are touching the floor. (This is the 90–90 position: The thighs form a 90-degree angle, and each knee is bent 90 degrees.)
- Rotate your torso to the right so that your right thigh is on the floor directly in front of you (position 1).
- Keeping your back straight, hinge forward at your hip joints until you feel a deep stretch in the muscles surrounding your right hip (2). Hold for 30 to 60 seconds.
- Come back to an upright position and rotate your shoulders to the left so you are facing your left leg. Hold for 30 to 60 seconds (3).
- Keeping your right leg planted, extend the toes of your left foot and lift your left knee. Forcefully contract your left glute, lifting your leg and opening your left knee as far to the left as you can; this is a RAIL stretch (4). Hold for a five-count.
- Lower the inside of your left knee back to the floor in front of you, then hinge the left knee back and forth three times, contracting your left glute for a five-count each time (5).
- Open your left knee to the left once more. Hold the middle position — legs splayed wide, the outside edges of the feet on the floor — for 15 seconds, squeezing the glutes so that your knees press closer toward the floor (6). This is also a RAIL stretch.
- Keeping your feet on the floor, rotate your body so you are sitting in the 90–90 position on the left side.
- Repeat the entire sequence on this side


